Photography Lighting Basics Explained: A Practical Guide for Photographers
Introduction
Understanding photography lighting basics is essential for creating compelling images that stand out in today’s competitive market. Whether you’re a beginner photographer just starting out, a hobbyist eager to improve your shots, or an aspiring professional building your portfolio and client base, mastering light is fundamental. Light shapes your subject, controls mood, and adds depth—without it, even the best composition falls flat.
Photography lighting is often perceived as complicated, but with clear principles and practical techniques, you can confidently control light to craft stunning images. This guide breaks down core lighting concepts, including natural light photography and the classic three point lighting setup, in straightforward language and actionable steps. We’ll explore how light direction, quality, color, and intensity affect your photos, and share real-world examples to help you apply these lessons immediately.
Moreover, lighting is not just about aesthetics; it’s a crucial part of your photography business toolkit. Good lighting reduces post-production time, impresses clients with polished images, and opens doors to more lucrative assignments. Understanding lighting basics can also empower you to work efficiently in diverse environments, whether shooting outdoors, in a studio, or on location.
By the end of this article, you’ll have a solid foundation in photography lighting basics, practical workflows to apply in your shoots, and tips to avoid common pitfalls. Let’s illuminate your path to better photography and business success.
Key Takeaways
– Mastering photography lighting basics is crucial for creating professional-quality images that attract and retain clients.
– Natural light photography relies on understanding the sun’s position, weather conditions, and how to manipulate available light through reflectors and diffusers.
– The three point lighting photography setup—key light, fill light, and back light—is a versatile framework that can be adapted both in studio and on location.
– Proper lighting enhances mood, texture, and dimension, reducing reliance on heavy editing and speeding up your workflow.
– Practical lighting setups save time, improve client satisfaction, and strengthen your photography brand.
– Avoid common mistakes like ignoring light direction, overexposing highlights, or neglecting the quality of shadows.
– Develop an action plan incorporating lighting tests, gear investment, and continuous learning to steadily improve your lighting skills.
Main Content
What Are Photography Lighting Basics and Why Do They Matter?
Photography lighting basics refer to fundamental principles that govern how light interacts with your subject and camera sensor. At its core, photography is about capturing light, and understanding these basics allows you to control your images rather than leaving them to chance.
Key concepts include light direction, quality (hard vs. soft light), color temperature, and intensity. For example, light direction influences the shadows on your subject, adding or reducing texture and dimension. Soft light (like on an overcast day) produces gentle shadows and is flattering for portraits, whereas hard light (like midday sun) creates strong shadows and high contrast.
Knowing how to manipulate these elements helps photographers create mood, highlight details, and ensure the subject is presented in the best possible way. This knowledge is invaluable for any photography niche, whether shooting portraits, products, events, or landscapes.
In practical terms, mastering lighting basics means you can adapt quickly when conditions change, maintain consistency across shoots, and deliver images that meet or exceed client expectations. It also reduces time spent fixing lighting problems in post-production, making your workflow more efficient.
How to Use Natural Light Photography Effectively
Natural light photography is a favorite among many photographers due to its accessibility and the beautiful, organic quality of sunlight. However, working with natural light requires understanding its nuances and learning to harness it strategically.
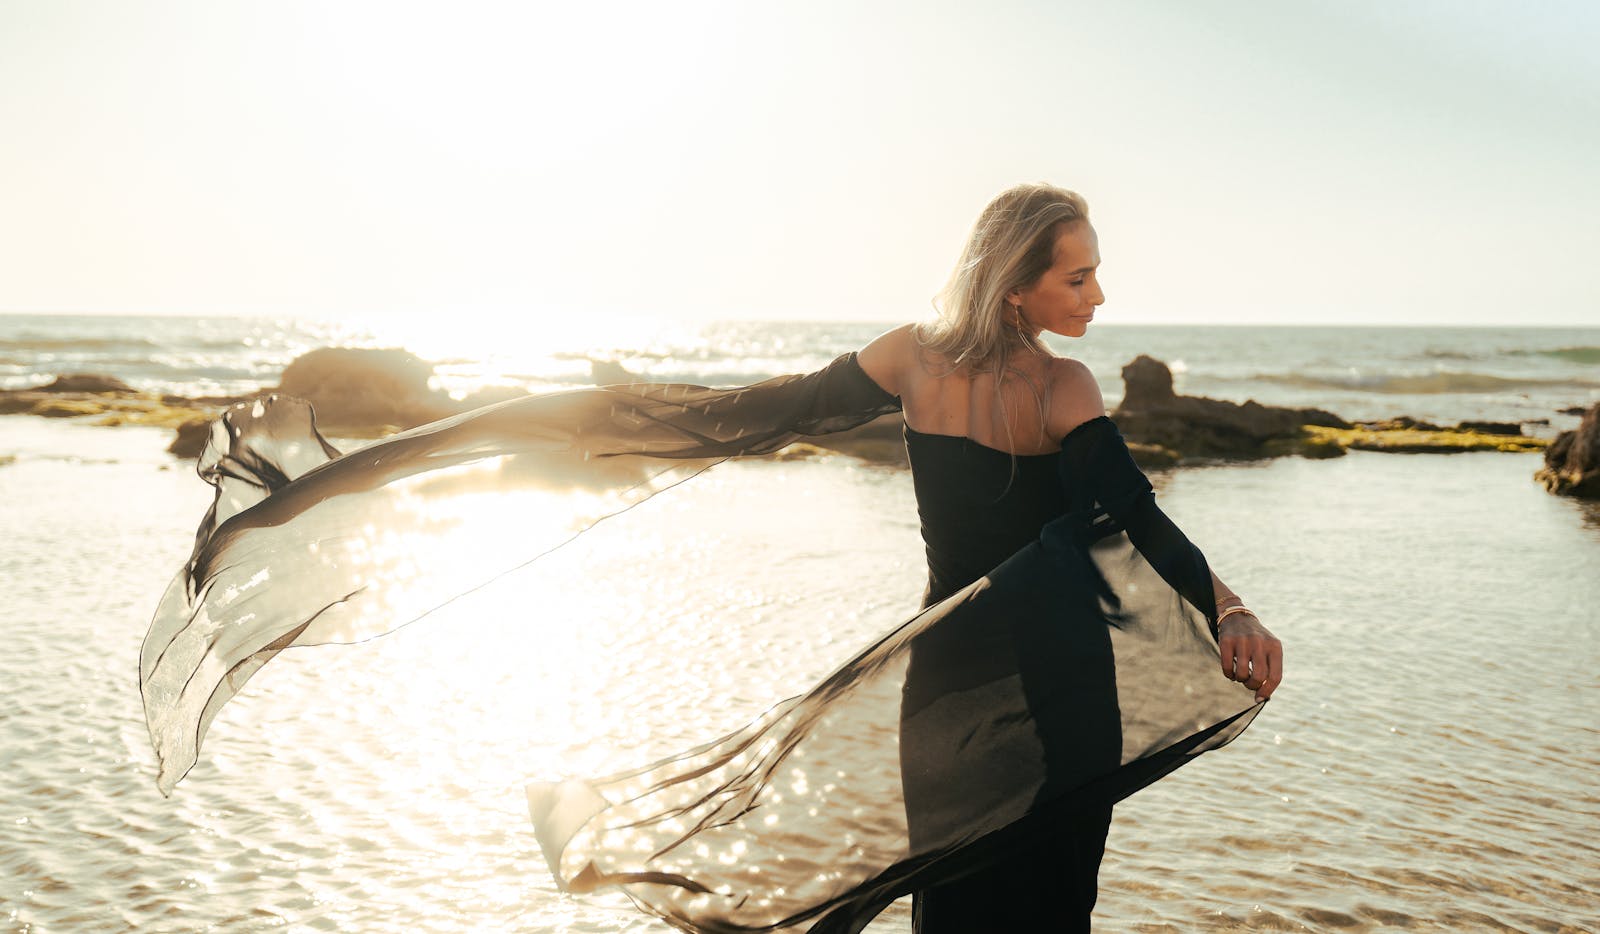
The sun’s position changes throughout the day, affecting color temperature and light direction. Early morning and late afternoon—often called the “golden hours”—offer warm, soft light that flatters most subjects. Midday sun is harsh and can cause unflattering shadows, so it’s best to seek shade or use modifiers like reflectors.
Here are practical steps to improve your natural light photography:
1. Scout Locations: Arrive early to observe how light moves and where the best spots are for your shoot.
2. Use Reflectors: Bounce light into shadows to soften contrast and illuminate faces. Reflectors come in white, silver, and gold—each creating different effects.
3. Diffusers: Use diffusers to soften harsh sunlight, creating more even lighting conditions.
4. Position Your Subject: Place your subject relative to the light source to control shadows and highlights. For example, side lighting adds depth, while front lighting flattens features but reduces shadows.
5. Understand Weather Effects: Cloudy days produce soft, diffused light perfect for portraits; bright sunny days might require shade or creative framing.
Mini Case Study: A portrait session with natural light at a park during golden hour allowed the photographer to use the warm side light to sculpt the subject’s face, while a white reflector bounced subtle fill light to minimize shadows under the eyes—resulting in a flattering, professional look without artificial lights.
What Is Three Point Lighting Photography and How Can You Use It?
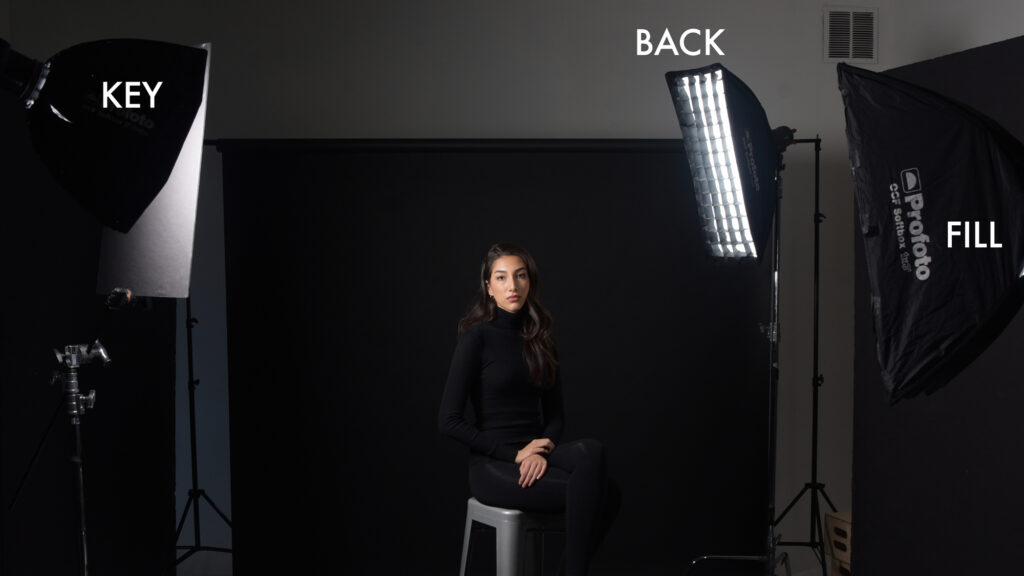
Three point lighting photography is a foundational studio lighting technique consisting of three light sources:
– Key Light: The main light illuminating the subject, typically the brightest.
– Fill Light: A softer light that reduces shadows created by the key light.
– Back Light (or Rim Light): Placed behind the subject to separate them from the background and add depth.
This setup can be adapted to many scenarios—portraits, product photography, video interviews, and more. Here’s how to implement it step-by-step:
1. Set the Key Light: Position it at a 45-degree angle to your subject, slightly above eye level. This creates natural shadows and highlights.
2. Add the Fill Light: Place it on the opposite side of the key light, also at about 45 degrees but at lower intensity to soften shadows without eliminating them.
3. Position the Back Light: Place it behind the subject, aimed at the back of their head or shoulders to create separation from the background.
Adjusting the intensity and distance of each light allows you to control contrast and mood. For example, a higher fill light creates a brighter, more evenly lit image suitable for commercial headshots, while lower fill light produces dramatic, moody portraits.
Real-World Tip: Many photographers start with continuous LED lights for three point lighting because they’re easy to adjust and see results in real-time. If working on a budget, DIY diffusers made from white bedsheets or translucent plastic can soften the light effectively.
How Does Light Direction Affect Your Photos?
Light direction is one of the most significant factors shaping the look of your photos. It determines where shadows fall, how textures are revealed, and how dimensional your subject appears.
The main directions to consider are:
– Front Lighting: Light hitting the subject directly from the camera’s perspective. It minimizes shadows and flattens features, often making images look less dimensional.
– Side Lighting: Light coming from the side creates strong shadows and highlights, emphasizing texture and depth—ideal for dramatic portraits or emphasizing detail.
– Back Lighting: Light shining toward the camera from behind the subject, often creating silhouettes or rim lighting effects. It adds mood and separation but requires careful exposure management.
– Top Lighting: Light from above, like midday sun or ceiling lights, can create unflattering shadows under eyes and nose.
– Under Lighting: Light from below, often avoided in general photography for its unnatural and eerie effects, but sometimes used creatively for dramatic impact.
Practical example: When photographing a product, side lighting reveals texture and shape, making the product pop. For a simple headshot, front lighting works to minimize shadows and create a clean look.
Actionable advice: Always observe where the light source is and move your subject or camera accordingly. Use a small LED flashlight or phone flashlight to simulate light direction when planning shoots indoors.
Understanding Hard Light vs. Soft Light and When to Use Each
Hard and soft light refer to the quality of light and how it casts shadows:
– Hard Light: Produces sharp, well-defined shadows and high contrast. It comes from small or direct light sources like midday sun or a bare flash.
– Soft Light: Produces diffused, gentle shadows with gradual transitions. It comes from large light sources or diffused light, such as an overcast sky or light bounced off a reflector.
Each has its place in photography:
– Hard light is excellent for creating dramatic, textured images, emphasizing details and shapes.
– Soft light is more flattering for portraits, smoothing skin textures and reducing harsh shadows.
How to create soft light: Use reflectors, diffusers, or shoot in shaded areas. For hard light, remove modifiers or shoot during bright sunlight.
Example: A wedding photographer might use hard side light during a sunset to create striking silhouettes but switch to soft light under a canopy to flatter the bride and groom’s faces.
How to Control Photography Lighting Basics on a Budget
Not every photographer has access to expensive studio gear, but controlling lighting basics is possible with minimal investment.
Here’s a budget-friendly framework:
1. Use Natural Light Smartly: Shoot during golden hours, use available shade, and bring inexpensive reflectors (white foam boards or car sunshades work well).
2. DIY Diffusers: Use translucent shower curtains, white bedsheets, or parchment paper to soften harsh light.
3. Affordable Continuous Lights: LED panels and ring lights are affordable and versatile for beginners.
4. Reflectors: Invest in or create multi-surface reflectors (gold, silver, white) to manipulate light color and intensity easily.
5. Light Modifiers: Use inexpensive umbrellas or softboxes for better light diffusion.
6. Experiment with Household Items: Aluminum foil, white paper, or black cardboard can create catchlights, block unwanted light, or control spill.
Practical Scenario: A product photographer working from home can set up a shooting table near a large window, use a white reflector to bounce sunlight onto shadows, and diffuse light with a translucent curtain—achieving professional results without studio costs.
How Lighting Impacts Your Photography Business and Client Satisfaction
Good lighting directly impacts your photography business in several ways:
– Client Impressions: Well-lit images look polished and professional, building client trust and satisfaction.
– Efficiency: Proper lighting reduces retakes and extensive editing, saving time and increasing profitability.
– Brand Identity: Consistent lighting style can become part of your signature look, differentiating you in a crowded market.
– Versatility: Mastering lighting basics enables you to work in various environments confidently, expanding your service offerings.
– Higher Pricing: Clients recognize the value of quality images and are often willing to pay more for photographers who deliver consistently great lighting and results.
Actionable Business Tip: Include a lighting consultation in your client meetings to discuss preferences and expectations. Show examples of your lighting styles to align their vision with your technical approach.
Mini Case Study: A portrait photographer who mastered three point lighting was able to offer in-studio sessions with quick turnaround times and consistently flattering images, resulting in repeat clients and referrals.
Common Mistakes
Many photographers struggle early on due to common lighting mistakes. Recognizing and avoiding these can accelerate your growth.
1. Ignoring Light Direction: Shooting without considering where the light falls leads to flat or unflattering images.
2. Overexposing Highlights: Bright areas blown out lose detail and reduce image quality.
3. Neglecting Shadows: Shadows add dimension; removing all shadows can make subjects look unnatural.
4. Relying Solely on Post-Processing: Trying to fix poor lighting in editing wastes time and diminishes image quality.
5. Using Harsh Light Without Diffusion: Direct sunlight or bare flash often causes harsh shadows and squinting subjects.
6. Failing to Adjust White Balance: Incorrect white balance can result in unnatural color casts.
7. Not Testing Lighting Setups: Skipping tests leads to surprises during shoots.
8. Overcomplicating Lighting: Beginners sometimes try to use too many lights or complicated setups instead of mastering basics first.
Example: A wedding photographer who ignored natural light direction ended up with portraits showing harsh shadows under eyes, distracting from the couple’s expressions. After learning to use reflectors and position the couple relative to the sun, the results improved dramatically.
What to Do Now
If you want to improve your photography lighting basics today, here’s a clear action plan to get started:
1. Study Light Sources: Spend a day observing natural light at different times. Notice how shadows and colors change.
2. Practice Three Point Lighting: Use household lamps to simulate key, fill, and back lights. Experiment with their positions and intensities.
3. Invest in Basic Gear: Purchase an affordable reflector and a small LED light panel. Use DIY diffusers to soften light.
4. Shoot Regularly: Practice portraits, still life, or products focusing solely on light quality and direction.
5. Review and Critique: Compare images shot with different lighting setups. Note what works and what doesn’t.
6. Learn Post-Processing Basics: Understand how exposure and white balance adjustments affect lighting.
7. Create a Lighting Checklist: Before every shoot, verify light sources, direction, and modifiers.
8. Join a Community: Engage with photography groups or forums to get feedback and share lighting tips.
By incorporating these steps into your routine, you’ll build confidence and improve your images systematically.
FAQs
1. What is the easiest way to start learning photography lighting basics?
Start with natural light photography. Observe how sunlight changes throughout the day and practice positioning your subject relative to the light. Use simple reflectors like white foam boards or car sunshades to bounce light and soften shadows. Experimenting with natural light builds a strong foundation before moving on to artificial lighting.
2. How can I make harsh sunlight more flattering for portraits?
Use diffusers such as translucent umbrellas, white bedsheets, or commercial diffusers to soften the sunlight. Alternatively, position your subject in the shade to avoid direct sun. Reflectors can bounce light into shadow areas, balancing exposure and reducing contrast for a more pleasing look.
3. Why is three point lighting important in photography?
Three point lighting provides control over shadows, highlights, and subject separation, creating professional and dimensional images. It’s a versatile setup used in portraits, product shots, and videos, allowing you to customize mood and depth easily.
4. Can I use continuous lights instead of flashes for three point lighting?
Yes, continuous LED lights are excellent for beginners because you see the lighting effect in real time. They allow easier adjustments to positioning and intensity, making setups faster and more intuitive, especially for video or studio portraits.
5. How does good lighting benefit my photography business?
Good lighting improves image quality, reduces editing time, and impresses clients with professional-looking photos. It leads to higher client satisfaction, repeat business, and positive referrals—all essential for growing your photography business.
Conclusion
Mastering photography lighting basics is a vital step toward elevating your craft and building a successful photography business. Whether working with natural light or artificial setups like the three point lighting system, understanding how to manipulate light’s direction, quality, and intensity empowers you to create images that truly stand out.
Practical knowledge of lighting not only enhances your creative possibilities but also improves efficiency, client relationships, and your professional reputation. By avoiding common mistakes and adopting a disciplined approach to lighting practice, you can confidently adapt to any shooting environment and consistently deliver polished results.
Remember, lighting is not an abstract concept reserved for experts—it’s a practical tool you can learn, experiment with, and refine every time you pick up your camera. Start with simple exercises, invest in basic gear, and pay attention to the light around you. Over time, this foundation will transform your photography from ordinary to exceptional, helping you capture images that tell compelling stories and grow your business.
Illuminate your journey with these photography lighting basics, and watch your skills—and your career—shine brighter than ever.