Exposure Triangle Explained for Beginners
Introduction
Understanding the exposure triangle is foundational for anyone serious about photography. Whether you’re a beginner just starting out or a hobbyist looking to improve your technical skills, grasping how ISO, aperture, and shutter speed work together will empower you to take full control of your camera. This knowledge not only helps you create correctly exposed images but also allows you to get creative with depth of field, motion blur, and image noise.
In the early days of digital photography, many photographers relied heavily on automatic modes, trusting the camera to make exposure decisions. While this can work in simple situations, it limits your creative control and can lead to frustration when the camera “guesses wrong.” Learning the exposure triangle means moving beyond automation, making informed decisions, and tailoring settings to your vision.
This article breaks down each component of the exposure triangle clearly and shows how they interrelate. You’ll get practical, real-world advice on balancing ISO, aperture, and shutter speed for different shooting scenarios. Additionally, we’ll explore common mistakes beginners make, how to avoid them, and actionable steps you can take to master exposure in your own photography business or personal projects.
By the end of this guide, you’ll have a solid understanding of the ISO aperture shutter speed relationship and be ready to shoot confidently in manual mode or creatively use semi-automatic settings like aperture priority. Let’s dive into the building blocks of exposure so you can elevate your photography from snapshots to compelling images.
Key Takeaways
– The exposure triangle consists of three fundamental camera settings: ISO, aperture, and shutter speed. Together, they control the brightness of your image.
– ISO determines your camera sensor’s sensitivity to light. Higher ISO brightens your image but increases noise.
– Aperture controls the size of the lens opening, affecting both exposure and depth of field (background blur).
– Shutter speed dictates how long the sensor is exposed to light, influencing motion blur and image sharpness.
– The ISO aperture shutter speed relationship means changing one setting requires compensating with another to maintain correct exposure.
– Mastering the exposure triangle enables creative control over your photos, helping you adapt to various lighting conditions and subjects.
– Practicing manual mode alongside shooting in aperture or shutter priority helps reinforce the concepts.
– Avoid common mistakes like relying too much on high ISO or using too slow shutter speeds without stabilization.
– A step-by-step approach to practicing exposure settings improves your confidence and photographic results.
—
What Is the Exposure Triangle and Why Does It Matter?
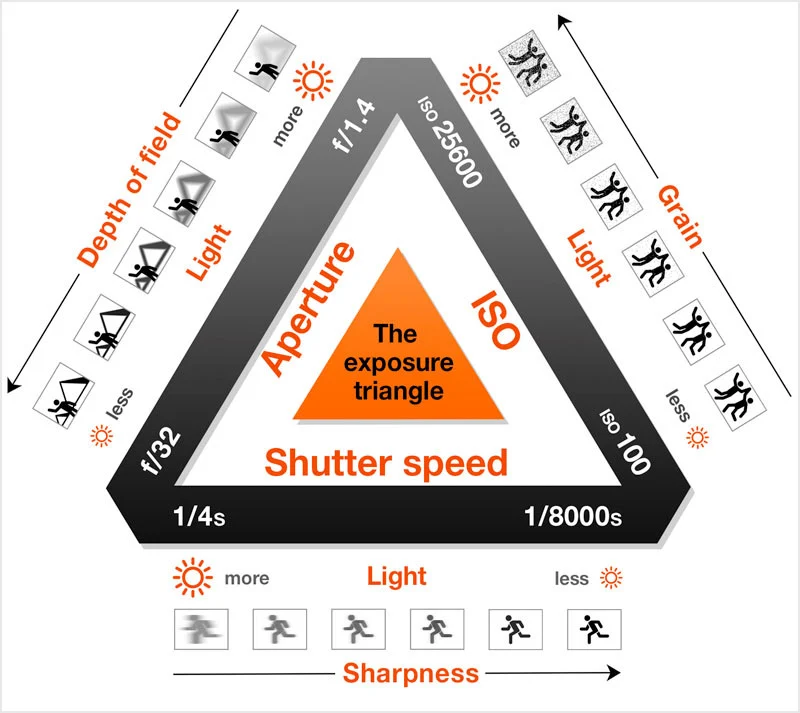
The exposure triangle is a fundamental concept that explains how three camera settings—ISO, aperture, and shutter speed—work together to determine the overall exposure of an image. Think of it as a three-legged stool; if one leg changes, the others must adjust to keep the image balanced.
Why is this important? Because exposure directly impacts how light or dark your photo appears. But exposure is more than just brightness; it also affects image quality, depth of field, and motion representation.
– ISO affects image noise and sensor sensitivity.
– Aperture affects depth of field and sharpness.
– Shutter speed affects motion blur and image sharpness.
Ignoring how these elements interact often leads to poorly exposed images or creative limitations. For photographers running a business, understanding exposure means fewer wasted shoots and happier clients, since you can deliver consistently well-exposed images in various environments.
Example Scenario: Wedding Photographer
Imagine you’re shooting a wedding ceremony indoors with low light. You want a wide aperture to blur the background, but opening the aperture wide reduces depth of field and lets in more light. To compensate, you might increase ISO or slow your shutter speed. However, slowing shutter speed too much risks motion blur if the bride or groom moves. Raising ISO might introduce noise, lowering image quality. Balancing these settings is critical to capturing sharp, well-exposed images with pleasing background separation.
—
What Is ISO and How Does It Affect Your Photos?
ISO refers to the sensitivity of your camera’s sensor to light. In the film days, ISO was a characteristic of the film roll; in digital photography, it’s an adjustable setting.
How ISO Works
– Low ISO (100-200): Sensor is less sensitive, ideal for bright conditions and produces clean, noise-free images.
– High ISO (800 and above): Sensor is more sensitive, allowing you to shoot in darker environments but introduces digital noise or grain.
Practical Advice for Beginners
– Start with the lowest ISO your camera allows (usually ISO 100).
– Increase ISO only when you need to maintain a fast enough shutter speed or smaller aperture.
– For handheld shooting, ISO may need to rise to avoid motion blur.
– Use your camera’s native ISO for the best image quality; pushing ISO too high can degrade photos.
Example: Shooting Indoors Without Flash
If you’re photographing a child’s birthday party indoors, you might start at ISO 100 but find that your shutter speed is too slow to freeze action. Increasing ISO to 800 or 1600 can help you use a faster shutter speed without the image getting too dark, though you’ll need to be mindful of the noise level.
ISO Tips for Business Photographers
– Know your camera’s ISO performance limits to set client expectations.
– Use noise reduction software like Topaz DeNoise AI to clean up high ISO shots.
– When possible, use additional lighting to avoid high ISO settings.
—
Understanding Aperture: More Than Just Exposure
Aperture is the opening inside your lens through which light passes. It’s measured in f-stops, like f/1.8, f/4, f/11. Smaller f-stop numbers mean a larger opening, allowing more light in; larger f-stop numbers mean a smaller opening, letting less light in.
Aperture’s Dual Role
1. Controls Exposure: A wide aperture (small f-number) brightens the image; a narrow aperture (large f-number) darkens it.
2. Controls Depth of Field: It affects how much of your image is in focus from front to back.
Depth of Field Explained
– Shallow depth of field: Achieved with wide apertures (f/1.8, f/2.8). Great for portraits to isolate subjects and create creamy backgrounds.
– Deep depth of field: Achieved with narrow apertures (f/11, f/16). Useful for landscapes where you want everything sharp.
Practical Aperture Tips
– For portraits, shoot wide open to blur backgrounds and highlight your subject.
– For group photos or landscapes, stop down to f/8 or f/11 for more focus throughout the frame.
– Know your lens’s “sweet spot” (usually 2-3 stops from wide open) for maximum sharpness.
Example: Outdoor Portrait Shoot
You’re photographing a client outdoors on a sunny day. You want to blur the background but also avoid overexposure. You set aperture to f/2.8 for a shallow depth of field, then adjust shutter speed and ISO to compensate for the bright light.
—
Shutter Speed: Freezing or Blurring Motion
Shutter speed controls how long your camera’s sensor is exposed to light. It’s measured in seconds or fractions of a second (e.g., 1/500, 1/30).
Effects of Shutter Speed
– Fast shutter speeds (1/500 sec or faster): Freeze motion, ideal for sports, wildlife, or children.
– Slow shutter speeds (1/30 sec or slower): Capture motion blur, useful for creative effects like smooth waterfalls or light trails.
Balancing Shutter Speed with ISO and Aperture
If you want to freeze action indoors, you might need a fast shutter speed (like 1/250 sec). To avoid underexposing, you’ll likely need to open the aperture wider or increase ISO. Conversely, if you want to create motion blur, use a slow shutter speed and compensate by narrowing your aperture or lowering ISO.
Practical Advice for Beginners
– Use the reciprocal rule as a starting point: Shutter speed should be at least 1/focal length (e.g., 1/50 sec for a 50mm lens) to avoid camera shake.
– Use a tripod for slow shutter speeds when you want sharp static subjects.
– Experiment with shutter priority mode (Tv or S) to practice controlling motion.
Example: Capturing Motion at a Sports Event
Shooting a soccer game, you set shutter speed to 1/1000 sec to freeze the players in action. To maintain correct exposure, you open aperture to f/4 and raise ISO to 800. This maintains brightness without blur.
—
How ISO, Aperture, and Shutter Speed Work Together: The Exposure Triangle Relationship
Understanding the ISO aperture shutter speed relationship is key to mastering exposure. These three settings are interconnected; when you adjust one, you must compensate with one or both of the others to maintain the correct exposure.
Step-by-Step Framework for Balancing Exposure
1. Determine your creative goal: Do you want motion blur? Deep depth of field? Minimal noise?
2. Set aperture based on depth of field needs: Wide for subject isolation, narrow for sharpness.
3. Adjust shutter speed based on motion: Fast to freeze, slow for blur.
4. Set ISO last to achieve proper exposure without compromising quality.
Example Scenario: Landscape Photography
You want a sharp landscape with everything in focus and no motion blur.
– Aperture: f/11 for deep focus.
– Shutter speed: 1/60 sec (handheld limit).
– ISO: Adjust ISO to 400 to brighten the image without excessive noise.
If ISO 400 is too noisy, consider using a tripod and lowering ISO to 100, then slowing shutter speed to several seconds.
—
Practical Tips for Beginners to Master the Exposure Triangle
Practice in Manual Mode
Switching to manual mode forces you to think about each setting and how it affects your image. Start with simple subjects and lighting conditions, then increase complexity as you grow confident.
Use Semi-Automatic Modes to Learn
Aperture Priority (Av or A) lets you control depth of field while the camera chooses shutter speed. Shutter Priority (Tv or S) lets you control motion blur while the camera picks aperture. These modes are great stepping stones.
Create Exposure Bracketing Habits
Take multiple shots adjusting exposure settings slightly each time. This helps you see how changes affect the image and builds intuition.
Don’t Forget the Histogram
Use your camera’s histogram to check exposure rather than relying only on the LCD preview. The histogram shows if your image is underexposed (clipped shadows) or overexposed (clipped highlights).
Use Exposure Compensation
When shooting in semi-automatic modes, use exposure compensation (+/-) to adjust brightness without switching fully to manual.
—
Common Mistakes Beginners Make with the Exposure Triangle
Understanding the exposure triangle doesn’t happen overnight. Many beginners struggle with common pitfalls that can be avoided with proper knowledge and practice.
Mistake 1: Relying Too Much on Auto ISO
Auto ISO can be helpful but often leads to unnecessarily high ISO settings, increasing noise. Learn to set ISO manually to control image quality.
Mistake 2: Ignoring Depth of Field
Photographers often focus only on exposure brightness but forget how aperture affects depth of field. This results in images with unintended background distractions or out-of-focus subjects.
Mistake 3: Using Too Slow Shutter Speed Handheld
Slow shutter speeds cause camera shake and blur, especially without a tripod. Beginners often don’t realize how fast they need to shoot, leading to soft images.
Mistake 4: Changing One Setting Without Adjusting Others
Changing ISO, aperture, or shutter speed independently without compensating leads to under- or overexposed photos. Remember the exposure triangle relationship.
Mistake 5: Not Understanding Exposure Metering
Relying solely on the camera’s meter without understanding the scene’s lighting can cause exposure errors, especially in backlit or high-contrast situations.
How to Avoid These
– Practice manual mode regularly.
– Review your shots and histograms.
– Use a tripod when possible.
– Educate yourself on how each setting affects the final image.
– Experiment with different lighting conditions.
—
What to Do Now: Action Plan for Mastering the Exposure Triangle
If you want to master the exposure triangle and take control of your photography, here’s a simple, actionable plan to get started:
Step 1: Learn Each Setting in Isolation
Spend a day photographing in controlled lighting, changing only ISO while keeping aperture and shutter speed constant. Then repeat for aperture and shutter speed. Note how each affects exposure and image characteristics.
Step 2: Practice Manual Mode
Set your camera to manual mode and apply the step-by-step framework:
– Choose aperture based on your creative intent.
– Select shutter speed for motion control.
– Adjust ISO to get correct exposure.
Take your time and review each shot’s histogram.
Step 3: Explore Semi-Automatic Modes
Use aperture priority to practice controlling depth of field and observe how shutter speed and ISO adjust automatically. Then switch to shutter priority to focus on motion control.
Step 4: Use Exposure Bracketing
Shoot the same scene multiple times, adjusting exposure settings slightly each time to see the differences. This builds your exposure intuition.
Step 5: Study Real-World Examples
Follow tutorials or analyze photos from professional photographers, noting their exposure settings and how they balance the triangle.
Step 6: Invest in Quality Gear
While technique matters most, having a camera with good high-ISO performance and lenses with wide apertures (like f/1.8 or f/2.8) gives you more flexibility.
Step 7: Keep Learning and Practicing
Exposure control is a skill that improves with consistent practice. Join workshops, online courses like those at ProPhotographyClass, and seek feedback from more experienced photographers.
—
FAQs
Q1: Can I rely on automatic mode instead of learning the exposure triangle?
Automatic mode can be convenient but limits creative control and often produces inconsistent results in challenging lighting. Learning the exposure triangle allows you to make intentional decisions, leading to better photos and more reliable outcomes, especially in professional settings.
Q2: What is the best aperture to use for portraits?
A wide aperture (small f-number like f/1.8 or f/2.8) is generally best for portraits because it creates a shallow depth of field, blurring the background and focusing attention on your subject. However, be mindful of focusing accuracy at wide apertures.
Q3: How do I choose the right shutter speed for action shots?
A fast shutter speed (1/500 sec or faster) is typically needed to freeze fast-moving subjects like sports or wildlife. The exact speed depends on the subject’s speed and your focal length. Remember to increase ISO or open aperture to maintain exposure.
Q4: What ISO should I use in low light conditions?
Start with the lowest ISO possible to maintain image quality. Increase ISO only as needed to achieve a usable shutter speed and aperture. Modern cameras can handle ISO 1600-3200 with acceptable noise, but test your camera’s limits.
Q5: How does aperture affect image sharpness besides depth of field?
Most lenses have a “sweet spot” aperture (often around f/5.6 to f/8) where image sharpness is maximized. Very wide or very narrow apertures can soften images due to lens aberrations or diffraction. Experiment with your lens to find its sharpest aperture.
—
Conclusion
Mastering the exposure triangle is an essential step for any photographer striving to improve their skills and creative control. By understanding the interplay between ISO, aperture, and shutter speed, you can confidently adapt to any lighting situation, produce images with intentional depth and motion effects, and elevate the quality of your work.
Whether you’re shooting portraits, landscapes, events, or commercial projects, the exposure triangle empowers you to make deliberate choices that impact both the technical and artistic outcomes of your photos. This knowledge also strengthens your professionalism when managing client expectations and delivering consistent, high-quality images.
Start by practicing in manual mode, experimenting with settings, and analyzing your results. Use semi-automatic modes to gradually build confidence, and always review your shots with attention to exposure and image quality. Remember, the exposure triangle is not just about brightness—it’s about telling your photographic story with precision and creativity.
For deeper learning, explore specialized tutorials and business advice at [ProPhotographyClass](https://prophotographyclass.com/blog/), where you’ll find resources tailored to photographers at every level. As you grow more comfortable balancing ISO, aperture, and shutter speed, you’ll unlock new creative possibilities and set your photography apart.
Take control of your camera and make every shot count by mastering the exposure triangle today.