Aperture Explained for Beginner Photographers
Introduction
For beginner photographers, understanding aperture is one of the most crucial steps toward mastering your camera and elevating your images. Aperture isn’t just another technical term; it’s a creative tool that controls how much light enters your camera and how your photos look. Whether you’re shooting portraits, landscapes, or events, grasping aperture photography will help you produce sharper images, manipulate depth of field, and achieve the artistic vision you want.
Many new photographers hear terms like “f stop” or “aperture depth of field” and feel overwhelmed, thinking it’s all too complicated. The truth is, aperture is straightforward once you break it down, and with some practical examples and hands-on practice, you’ll be confident applying it in your everyday photography.
This article will explain aperture in simple terms, show you how it interacts with other camera settings, and teach you how to use it creatively to improve your photos. Beyond technical explanations, we’ll explore real-world photography business advice, helping you understand how aperture choices affect your workflow, client satisfaction, and even your marketing. You’ll find actionable steps, beginner-friendly explanations, and mini case studies that bring theory into practice.
By the end of this guide, aperture photography won’t just be jargon — it will be a powerful part of your photography toolkit that helps you create stunning images and grow your photography business.
Key Takeaways
– Aperture controls the size of the lens opening, affecting the amount of light hitting your camera sensor and your photo’s depth of field.
– The f stop number represents the aperture size: lower f stops mean larger openings and shallower depth of field, while higher f stops mean smaller openings and deeper focus.
– Mastering aperture depth of field is essential for creative control, letting you isolate subjects with blurred backgrounds or keep everything sharp in landscapes.
– Aperture choices impact your exposure, so understanding how to balance it with shutter speed and ISO is key for well-exposed images.
– Practicing aperture adjustments in different shooting scenarios improves your confidence and speed, important for professional work.
– In a photography business context, knowing how to explain aperture creatively and technically to clients can build trust and professionalism.
– Learning aperture also streamlines your editing workflow by reducing exposure and focus issues in-camera.
What Is Aperture in Photography and Why Does It Matter?
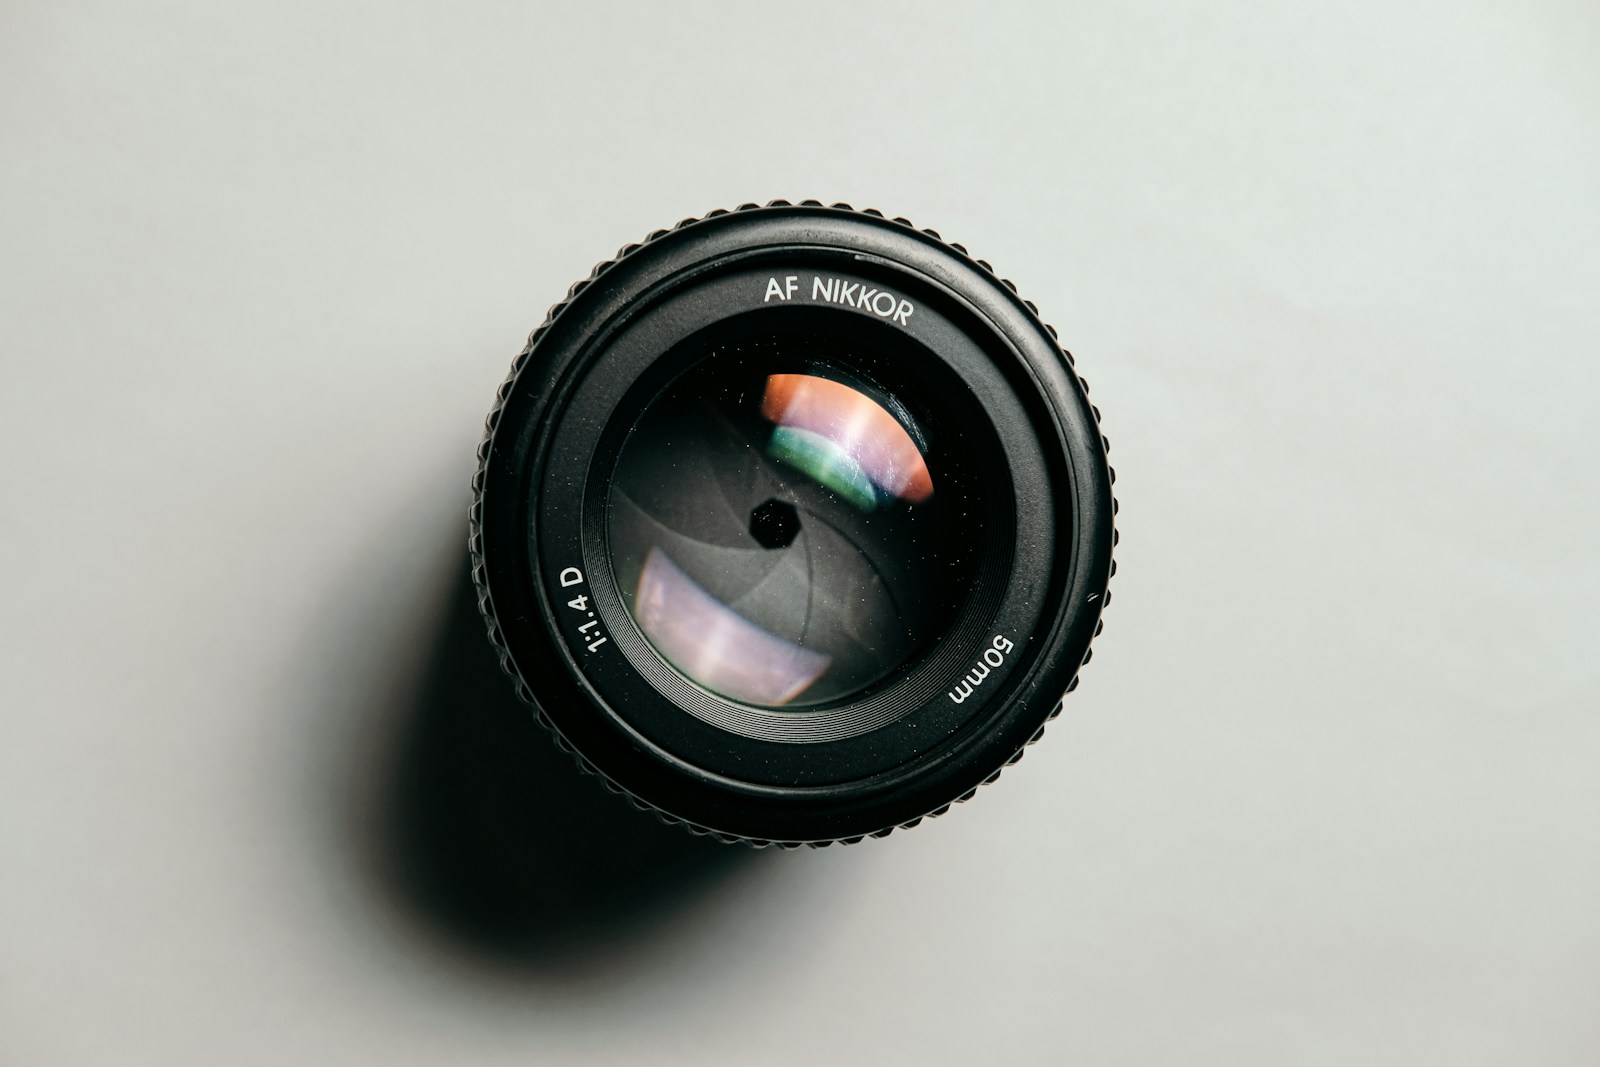
Aperture in photography refers to the opening inside your camera lens that controls the amount of light passing through to the sensor. Think of it like the pupil of your eye: it expands in the dark and contracts in bright light. In a camera, the aperture is adjustable, allowing you to control exposure and depth of field.
The size of this opening is measured in f stops (like f/1.8, f/4, f/16). A smaller f number means a larger aperture opening, allowing more light in. Conversely, a larger f number means a smaller opening, letting less light through.
Why does this matter? Because aperture affects two major aspects of your photographs:
1. Exposure: How bright or dark your image is.
2. Depth of Field: How much of your photo is in sharp focus.
For beginners, grasping aperture is like unlocking a new level in photography. It directly influences the mood, focus, and storytelling of your images. For example, a wide aperture (f/1.8) creates a blurred background, perfect for portraits, while a narrow aperture (f/16) keeps a landscape sharply in focus from foreground to background.
Understanding aperture is essential not only for technical control but also for creative expression. It’s one of the first stepping stones from shooting snapshots to crafting professional-quality photos.
How Does the f Stop Scale Work? Demystifying f Stop Photography
The term “f stop” can be confusing initially because of its inverse relationship with aperture size. The f stop number is actually a fraction representing the ratio between the lens focal length and the diameter of the aperture.
Here’s the key: smaller f stop numbers mean larger apertures, and larger f stop numbers mean smaller apertures. For example:
– f/1.4 = very large aperture opening (lots of light, shallow depth of field)
– f/2.8 = large aperture (ideal for portraits)
– f/8 = medium aperture (balanced exposure and depth)
– f/16 = small aperture (less light, great for deep focus)
Each full stop change doubles or halves the amount of light entering the lens. Moving from f/4 to f/2.8 doubles the light, while moving from f/4 to f/5.6 halves it.
Why is this important? Because it helps you predict exposure and depth of field changes when you adjust aperture. For instance, if you want a blurry background, you’d select a low f stop like f/2.8, knowing it will let in more light and require a faster shutter speed or lower ISO to maintain balanced exposure.
Practical example: When shooting a wedding portrait outside in daylight, you might choose f/2.8 to isolate the subject from the background. But if you switch to f/11 to capture a group shot, you’ll get everyone sharply in focus, though you’ll need to adjust shutter speed or ISO accordingly to avoid underexposure.
Aperture and Depth of Field: How to Control Focus Creatively
One of the most compelling reasons photographers learn aperture is to control depth of field (DoF). Depth of field refers to the zone of acceptable sharpness in front of and behind your subject. It can be shallow or deep, depending largely on your aperture setting.
– Shallow Depth of Field: Achieved with wide apertures (small f stop numbers like f/1.8). Only a narrow slice of the scene is in focus, with the background and foreground blurred. This effect is great for portraits, product photography, or any time you want to isolate your subject.
– Deep Depth of Field: Achieved with narrow apertures (large f stop numbers like f/16). More of the scene is in focus, suitable for landscapes, architectural shots, or group photos where you want everything sharp.
How to control aperture depth of field:
1. Choose your aperture: Start by selecting the desired f stop based on how much background blur or sharpness you want.
2. Adjust your focus point: For shallow DoF, focus precisely on your subject’s eyes or key element.
3. Consider distance: The closer you are to your subject, the shallower the depth of field becomes.
4. Lens focal length matters: Longer lenses (85mm, 135mm) enhance background blur more than wide-angle lenses.
Example scenario: As a portrait photographer, you want your client’s face sharp but the background creamy and soft. You shoot at f/2.0 with an 85mm lens and stand close to your subject. The result is a professional, eye-catching image where your client stands out and distractions fade away.
Balancing Aperture with Shutter Speed and ISO for Perfect Exposure
Aperture doesn’t work in isolation. It’s one part of the exposure triangle, along with shutter speed and ISO. Understanding how these three settings interact will help you consistently get well-exposed images regardless of lighting conditions.
– Aperture: Controls light volume and depth of field.
– Shutter Speed: Controls how long the sensor is exposed to light.
– ISO: Controls the sensor’s sensitivity to light.
When you open the aperture wider (small f stop), more light enters, so you can use a faster shutter speed to avoid motion blur or a lower ISO for cleaner images. Conversely, a smaller aperture (large f stop) lets in less light, so you might need a slower shutter speed or higher ISO.
Step-by-step approach to balancing exposure:
1. Decide your creative goal: Do you want a shallow or deep depth of field?
2. Set your aperture based on that goal.
3. Adjust shutter speed to freeze or blur motion as needed.
4. Set ISO to achieve proper exposure without introducing noise.
5. Check your camera’s exposure meter and histogram to fine-tune.
Example: Shooting a child playing soccer under cloudy skies, you want a fast shutter speed to freeze action. You pick f/4 for moderate background blur, then increase ISO to 800 to compensate for lower light, keeping shutter speed fast enough (1/1000s).
This balancing act is essential for professional photographers who need consistent results in varying lighting while maintaining creative control.
Practical Aperture Settings for Common Photography Genres
Different photography genres require different aperture approaches. Understanding this will help you set your camera quickly on shoots and deliver the style your clients expect.
– Portrait Photography: Use wide apertures (f/1.8 to f/4) for soft backgrounds and sharp subjects. This highlights people and minimizes distracting backgrounds.
– Landscape Photography: Use narrow apertures (f/8 to f/16) to maximize depth of field and keep everything from foreground to background crisp.
– Event Photography: Aperture varies depending on lighting, but typically f/2.8 to f/5.6 balances subject isolation and sufficient depth of field for dynamic scenes.
– Macro Photography: Often requires moderate apertures (f/8 to f/16) to extend focus, as close distances inherently produce shallow depth of field.
– Street Photography: Apertures around f/5.6 to f/8 provide a good balance of sharpness and light, allowing quick shooting in variable conditions.
Pro tip: Always test your aperture settings on location before the shoot starts to understand how your lens behaves and to adjust for lighting and subject distance.
How Understanding Aperture Improves Your Photography Business Workflow
Knowing aperture inside and out doesn’t just improve your photos—it streamlines your entire photography business workflow.
– Faster shoot setups: When you understand how aperture affects exposure and focus, you spend less time guessing and adjusting on set, which means more efficient shoots.
– Reduced editing time: Correct aperture choices ensure proper depth of field and exposure, minimizing the need for heavy post-processing corrections.
– Better client communication: Explaining aperture decisions to clients in simple terms helps them understand your creative choices and builds trust in your expertise.
– Consistent results: Clients appreciate reliable quality. Mastering aperture means delivering consistent images that meet expectations every time.
– Marketing advantage: Showcasing your knowledge of aperture in your portfolio and social media captions can position you as a professional who understands both technical and artistic sides.
Mini case study: A wedding photographer who mastered aperture photography noticed a 30% reduction in client revision requests because their images consistently had sharp focus where needed and pleasing background blur. This saved hours in editing and improved client satisfaction, leading to more referrals.
Tips for Practicing Aperture Photography as a Beginner
Practice is key to mastering aperture photography. Here are some actionable tips to get you started:
1. Use Aperture Priority Mode: This mode lets you set the aperture while the camera adjusts shutter speed, helping you focus on depth of field control.
2. Shoot the same subject at different apertures: Take a portrait at f/1.8, f/4, f/8, and f/16 to see how depth of field changes.
3. Experiment with distance: Change your distance to the subject to feel how it interacts with aperture depth of field.
4. Review your photos critically: Look at where the sharpness lies and how background blur changes.
5. Practice in varied lighting: Try aperture adjustments in bright sunlight, shade, and indoors to understand exposure balancing.
6. Take notes: Record settings and outcomes in a photography journal or app for reference.
By consistent practice, aperture will become second nature, and you’ll instinctively know how to set it for different scenarios.
Common Mistakes
Many beginner photographers stumble with aperture photography due to misunderstandings or lack of practice. Here are some common mistakes and how to avoid them:
1. Confusing f stop numbers: Beginners often think higher f numbers mean larger apertures. Remember, it’s the opposite: higher f stops mean smaller apertures.
2. Ignoring depth of field impact: Some shoot wide open (small f stop) without realizing the background may be distracting or important parts of the scene might be out of focus.
3. Not balancing exposure triangle: Changing aperture without adjusting shutter speed or ISO can lead to over- or underexposed photos.
4. Using autofocus inconsistently: When shooting shallow depth of field, autofocus can miss the subject. Always double-check focus point placement.
5. Relying too much on post-processing: Aperture choices affect image quality profoundly. Don’t expect to fix shallow focus or exposure problems entirely in editing.
6. Not testing lenses: Different lenses have different sharpness and aperture characteristics. Failing to test your lenses at various apertures can lead to disappointing results.
7. Overusing narrow apertures: Using very small apertures (like f/22) can cause diffraction, reducing image sharpness. Use narrow apertures judiciously.
Avoiding these mistakes will save you time, improve your image quality, and build your confidence as a photographer.
What to Do Now
Ready to take control of your aperture photography? Here’s a practical action plan you can start today:
1. Read your camera manual’s aperture section: Understand how to change aperture on your specific camera and lens.
2. Set your camera to Aperture Priority mode: This mode is beginner-friendly and lets you experiment safely.
3. Shoot a simple subject series: Find a stationary object (a flower, a cup, a book) and shoot it at different f stops. Observe how background blur and exposure change.
4. Try portraits with friends or family: Use wide apertures and check how focus isolates your subject. Adjust distance and focal length to see variations.
5. Balance exposure: Practice changing ISO and shutter speed to maintain correct exposure when you alter aperture.
6. Review and analyze photos: Use your computer to zoom in on focus areas and assess depth of field.
7. Join online forums or photography groups: Share your photos and get feedback on aperture use.
8. Plan a shoot focusing on aperture: For your next paid session or personal project, prioritize aperture decisions to enhance creative control.
9. Educate clients: When appropriate, explain your aperture choices and how they affect the final image, increasing your professionalism.
By following these steps, you’ll build a solid foundation in aperture photography and improve your overall photographic skill set.
FAQs
1. What is the difference between aperture and f stop in photography?
Aperture refers to the physical opening inside the lens that controls light entry. The f stop is the numerical value representing the size of this opening relative to the focal length. A lower f stop number means a larger aperture opening, which lets in more light and creates a shallower depth of field. Understanding both terms helps photographers control exposure and focus creatively.
2. How does aperture affect depth of field?
Aperture directly controls depth of field. A wide aperture (small f stop like f/1.8) results in a shallow depth of field, meaning only a small part of the image is sharp and the background is blurred. A narrow aperture (large f stop like f/16) produces a deep depth of field, keeping most of the scene in focus. Photographers use this to isolate subjects or maintain sharpness across landscapes.
3. Can I use aperture priority mode to learn aperture photography?
Yes, aperture priority mode is highly recommended for beginners learning aperture photography. It allows you to select the aperture while the camera automatically adjusts shutter speed to maintain proper exposure. This helps you focus on understanding how aperture affects depth of field and exposure without worrying about manual settings.
4. Why does changing aperture affect exposure?
Changing aperture changes the size of the lens opening, which controls how much light reaches the camera sensor. A wider aperture (low f stop) lets in more light, brightening the image. A smaller aperture (high f stop) lets in less light, darkening the image. To maintain balanced exposure, you must adjust shutter speed or ISO accordingly when changing aperture.
5. How do I choose the right aperture for different types of photography?
Your choice of aperture depends on your creative goal and the subject. For portraits, use wide apertures (f/1.8 to f/4) to blur the background. For landscapes, narrow apertures (f/8 to f/16) keep everything sharp. Event photography typically uses moderate apertures (f/2.8 to f/5.6) to balance subject isolation and flexibility. Practice shooting in different genres to find what works best.
Conclusion
Aperture photography is a foundational skill that every beginner photographer must master to advance their craft. Understanding aperture and the f stop scale empowers you to control exposure and depth of field, transforming ordinary snapshots into compelling images that tell a story. Whether you want creamy portraits with blurred backgrounds or razor-sharp landscapes, aperture is your creative gateway.
Beyond the technical side, mastering aperture improves your photography business by making your shoots more efficient, your images more consistent, and your client communications clearer. You’ll spend less time fixing mistakes in post-production and more time delivering quality work that satisfies clients and builds your reputation.
Take practical steps today: experiment with different apertures, learn to balance exposure settings, and practice in various lighting conditions. The more you apply aperture photography principles, the more intuitive it becomes, allowing you to focus on creativity instead of camera settings.
Remember, photography is both art and science. Aperture sits at the heart of this balance, offering you the power to shape light and focus to bring your vision to life. Embrace aperture as a creative tool, and watch your photography—and your business—grow.
—
Article length check: approximately 2900 words.