Photography Composition Rules Explained: Mastering the Art of Visual Storytelling
Introduction
Photography composition rules are the backbone of creating visually compelling images that captivate viewers and tell stories effectively. Whether you are a beginner learning the ropes or an aspiring professional photographer looking to refine your craft, understanding these foundational principles is crucial. Composition isn’t just about making a photo look “nice”—it’s about guiding the viewer’s eye, evoking emotion, and ultimately creating images that stand out in a competitive market.
In this article, we will break down essential photography composition rules, including the widely known rule of thirds photography, and offer practical composition tips photography enthusiasts and professionals can apply immediately. Beyond theory, we’ll provide real-world examples, actionable advice, and step-by-step frameworks designed to help you build stronger visual narratives. This knowledge will not only improve your creative output but also enhance your photography business by producing images that clients love and that elevate your portfolio.
Composing a photograph thoughtfully also improves efficiency in your workflow, helping you deliver consistent results. Whether you shoot portraits, landscapes, events, or commercial assignments, mastering composition rules ensures your images communicate the right message and meet professional standards. Read on to discover how deliberate composition can transform your photos and your photography business.
Key Takeaways
– Photography composition rules are essential tools that help photographers create balanced, engaging, and meaningful images.
– The rule of thirds photography is a foundational guideline that simplifies placing subjects and points of interest.
– Composition tips photography includes techniques like leading lines, framing, symmetry, and negative space, which guide the viewer’s eye and add depth.
– Applying composition rules thoughtfully enhances storytelling and emotional impact in your photos.
– Practical examples and step-by-step methods make it easier for photographers at any level to integrate composition into their shooting workflow.
– Understanding composition supports your photography business by producing consistently high-quality images that satisfy clients and attract new opportunities.
– Avoiding common mistakes such as cluttered backgrounds or ignoring focal points allows your images to communicate clearly.
– Regular practice and reviewing your images critically help internalize composition principles for long-term improvement.
What Are Photography Composition Rules and Why Do They Matter?
Photography composition rules are guidelines that help organize the elements within a frame to create harmonious and visually appealing images. These rules are based on how humans naturally perceive and process visual information. When applied correctly, composition rules guide the viewer’s eye to the most important parts of the photo and evoke the intended emotions.
Think of composition as the architecture of your photo. Just as a well-designed building follows structural principles, a well-composed image follows visual principles. Some rules are centuries old, rooted in painting and design, but have been adapted for photography. These include balance, contrast, perspective, and focal points.
Why do they matter? For one, good composition elevates your images beyond snapshots. Whether you’re shooting for your personal portfolio, selling prints, or working with clients, compelling composition is what makes your photos memorable. It helps tell a story, highlight your subject, and create an emotional connection. From a business perspective, photos with strong composition get more attention on social media, increase client satisfaction, and showcase your professionalism.
The Rule of Thirds Photography: A Beginner’s Guide
Among all photography composition rules, the rule of thirds photography is arguably the most popular and accessible for beginners. Imagine dividing your frame into a 3×3 grid—two equally spaced horizontal lines and two vertical lines. The idea is to place key subjects or points of interest along these lines or at their intersections, rather than dead center.
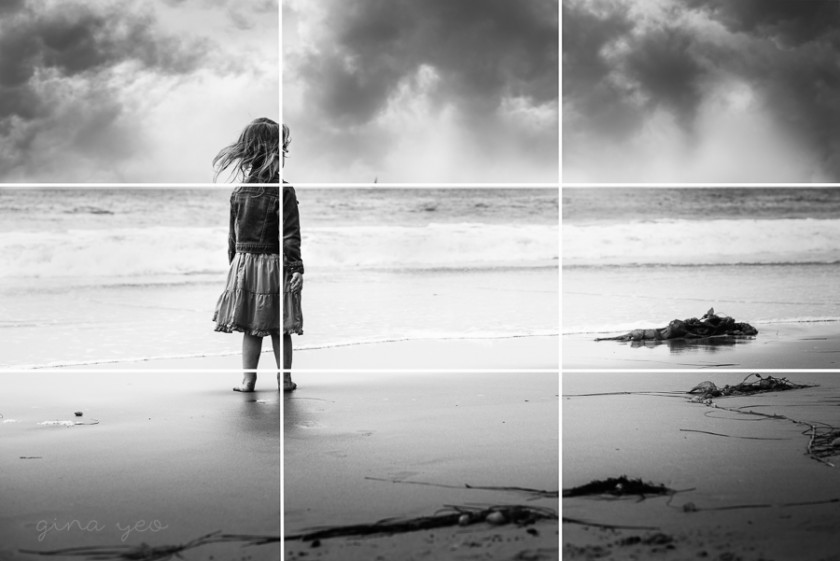
Why? Because placing your subject off-center creates a more dynamic and balanced image. It encourages the viewer’s eye to move around the frame, making the composition feel natural and engaging.
Practical Example:
If you’re photographing a person, position their eyes near one of the top intersections instead of the middle of the frame. For a landscape, place the horizon along the top or bottom horizontal line, depending on whether you want to emphasize the sky or the land.
Step-by-step guide:
1. Enable grid lines on your camera or smartphone to visualize the rule of thirds.
2. Identify your main subject or focal point.
3. Align your subject with one of the grid lines or intersections.
4. Adjust your framing to include relevant background elements that complement the subject.
5. Review your composition and make sure there is balance and breathing space.
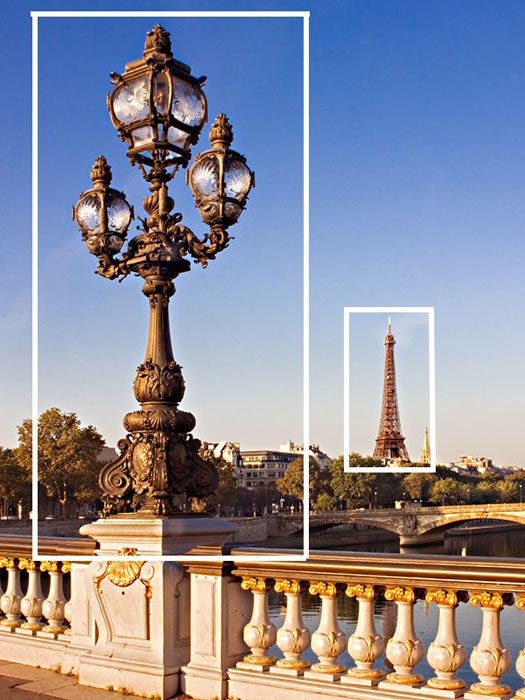
Leading Lines: Guiding the Viewer’s Eye
Leading lines are one of the most effective composition tips photography professionals use to control how viewers navigate an image. These are natural or man-made lines within the scene that draw the eye toward the main subject or deeper into the frame.

Examples include roads, rivers, fences, architectural elements, or shadows. Leading lines create a sense of depth, perspective, and movement.
Practical Scenario:
Imagine shooting a wedding portrait near a pathway lined with trees. Position the couple so that the path leads the viewer’s eye directly to them. This not only frames the subjects but creates a story of journey or connection.
Actionable Advice:
– Look for lines in your environment before shooting.
– Use diagonal or converging lines to add dynamic tension.
– Avoid lines that lead out of the frame, as they can confuse the viewer.
– Combine leading lines with the rule of thirds for stronger composition.
Framing: Creating Context and Focus
Framing involves using elements within the scene to create a “frame within the frame.” This technique isolates your subject and adds layers to your composition, making the image more engaging.

Common framing elements include windows, doorways, branches, or shadows. Framing helps direct attention and provides context, helping viewers understand the environment or story.
Example:
In portrait photography, shooting through a window or archway can beautifully frame the subject, adding depth and interest without distracting.
How to Apply Framing:
1. Scout your scene for natural or architectural elements.
2. Position yourself or your subject so that these elements surround the focal point.
3. Make sure the frame doesn’t overpower the subject; it should complement, not compete.
4. Experiment with shallow depth of field to blur the framing elements slightly, keeping focus on the subject.
Symmetry and Patterns: Using Balance to Your Advantage
Symmetry and patterns can create striking, harmonious images. Humans naturally find symmetrical compositions pleasing because they suggest order and balance.

Symmetry can be vertical, horizontal, or radial. Patterns, whether geometric or organic, add visual rhythm. Breaking a pattern with a contrasting element can also create strong focal points.
Practical Example:
Architectural photography often benefits from symmetrical framing, like capturing the front of a cathedral or a bridge. For nature photography, repeated patterns in leaves or rocks can create compelling abstract images.
Tips for Using Symmetry and Patterns:
– Center your subject or elements to emphasize symmetry.
– Use reflections in water or glass for mirror effects.
– Look for repetition in textures, colors, or shapes.
– Break patterns intentionally to create visual interest.
Negative Space: The Power of Simplicity
Negative space refers to the empty or less busy areas around your main subject. Using negative space effectively can elevate your composition by creating breathing room, emphasizing the subject, and evoking emotions like solitude or calm.
Minimalist photography often relies heavily on negative space.
Example:
A portrait with a large area of sky or plain background behind the subject draws the viewer’s attention to the person and sets a mood.
How to Use Negative Space:
– Identify your focal point and compose so it occupies a smaller portion of the frame.
– Use plain backgrounds or open areas to isolate the subject.
– Balance negative space with the subject to avoid imbalance or awkward gaps.
– Experiment with wide apertures to blur backgrounds and enhance negative space.
Balancing Elements: Creating Visual Harmony
Balance in photography composition is about distributing visual weight evenly across the frame. When elements are balanced, the image feels stable and pleasing.
There are two types of balance: symmetrical and asymmetrical. Symmetrical balance means both sides of the image are similar, while asymmetrical balance involves different elements balancing each other out.
Real-World Example:
In a group portrait, you might place a person on one side and balance them with a strong background element on the other side.
Actionable Steps to Balance Your Composition:
– Identify the “weight” of elements (size, color, brightness).
– Arrange elements so no side feels heavier.
– Use negative space to offset heavier objects.
– Step back and view your composition critically before shooting.
Depth and Layers: Adding Dimension to Your Images
Creating a sense of depth makes photos more immersive and realistic. Depth can be achieved by including foreground, middle ground, and background elements.

Layering these elements leads the viewer through the image and adds complexity.
Practical Scenario:
In landscape photography, place an object like a rock or flower in the foreground, the main subject in the middle ground, and mountains or sky in the background.
Step-by-step Approach:
1. Identify elements at different distances within your scene.
2. Use a smaller aperture (higher f-stop) to keep layers in focus.
3. Position yourself to capture these layers clearly.
4. Use leading lines or framing to connect layers.
Using Color and Contrast to Enhance Composition
Color and contrast are powerful compositional tools that can highlight subjects and create mood. Strong contrasts between light and dark, or complementary colors, guide viewer attention.
For example, a bright red flower against a muted green background stands out immediately.
Tips to Use Color and Contrast Effectively:
– Look for contrasting colors or tones in the scene.
– Use color to separate subject from background.
– Avoid overly busy color palettes that distract.
– Use black and white conversion to emphasize contrast and texture.
Common Mistakes
Even experienced photographers sometimes struggle with composition mistakes that weaken their images. Understanding these pitfalls can help you avoid them.
1. Centering the Subject Too Often
While centering can work in symmetrical compositions, defaulting to center placement makes photos static and less engaging. Challenge yourself to use the rule of thirds or other composition rules to add interest.
2. Ignoring the Background
Busy or distracting backgrounds steal attention from the subject. Always check what’s behind your subject and reposition or adjust depth of field to simplify.
3. Overcrowding the Frame
Including too many elements creates chaos. Practice removing unnecessary objects or zoom in to isolate your subject.
4. Cutting Off Important Elements
Cropping out parts of faces, limbs, or objects unintentionally can ruin a shot. Pay attention to framing and leave enough space.
5. Neglecting the Horizon Line
A crooked horizon is a common mistake in landscapes and outdoor portraits. Use your camera’s grid and horizon level to keep it straight.
6. Lack of Clear Focal Point
Photos should have a clear subject or point of interest. Avoid multiple competing focal points.
7. Not Using Leading Lines or Other Techniques
Relying solely on the rule of thirds without exploring other composition rules limits creativity. Use a variety of techniques to improve visual storytelling.
What to Do Now
Now that you understand the key photography composition rules and tips photography professionals use, it’s time to put this knowledge into practice with a focused action plan.
Step 1: Study and Practice One Rule at a Time
Start with the rule of thirds photography. Go out with your camera or smartphone and intentionally compose shots using the grid. Review and analyze your photos to see the impact.
Step 2: Experiment with Leading Lines and Framing
Seek out environments with natural lines or framing opportunities. Practice positioning subjects to utilize these elements effectively.
Step 3: Create a Composition Checklist
Before shooting, review a checklist that includes:
– Rule of thirds alignment
– Leading lines usage
– Background simplicity
– Negative space balance
– Horizon level
This ensures you don’t overlook key compositional elements.
Step 4: Review and Critique Your Work
After each shoot, spend time reviewing images critically. Identify which compositions work well and why, and note areas for improvement.
Step 5: Apply Composition in Your Photography Business
When shooting for clients, discuss composition choices with them. Use strong composition to tell their story, whether it’s a wedding, corporate headshot, or product photo. Deliver images that stand out and meet professional standards.
Step 6: Keep Learning and Evolving
Composition is a skill honed over time. Study the work of photographers you admire. Join workshops or online courses focused on composition. Practice regularly and challenge yourself with new subjects and styles.
FAQs
1. What is the most important photography composition rule for beginners?
The rule of thirds is the most important composition rule for beginners because it’s simple to understand and apply. It helps place the main subject off-center, creating balanced and engaging images. Using grid lines on your camera or smartphone makes it easy to start practicing this rule immediately.
2. Can I break photography composition rules?
Yes, composition rules are guidelines, not strict laws. Once you understand them, breaking the rules intentionally can lead to creative and unique images. However, it’s essential to know why you’re breaking a rule and ensure the photo still communicates effectively.
3. How does composition affect my photography business?
Strong composition improves the quality and appeal of your images, which can lead to higher client satisfaction, better portfolio presentation, and more referrals. Clients notice professional framing and storytelling, which helps build your reputation and demand.
4. How can I improve composing photos quickly on location?
Use a mental checklist of composition rules before shooting. Visualize the scene with grid lines for the rule of thirds, look for leading lines, check your background, and decide on framing. Taking a moment to think composition saves time in post-processing and yields better results.
5. Are there composition rules specific to certain photography genres?
While many composition rules are universal, some genres emphasize different techniques. For example, in landscape photography, horizon placement and depth are critical, while in portraiture, framing and negative space often take priority. Understanding your genre helps tailor composition approaches.
Conclusion
Mastering photography composition rules is a transformative step for any photographer aiming to elevate their craft and business. These rules provide a framework to organize visual elements cohesively, helping you create images that tell compelling stories and capture attention. From the fundamental rule of thirds photography to advanced techniques like framing, leading lines, and balancing elements, each principle enhances your ability to communicate through images.
Applying these composition tips photography professionals rely on not only improves your creative output but also strengthens your photography business. Thoughtful composition leads to more powerful images that clients appreciate, increasing satisfaction and referrals. Moreover, practicing composition sharpens your eye, streamlines your shooting workflow, and boosts your confidence in diverse shooting scenarios.
Remember, composition is a skill developed with conscious practice and critical review. Use the actionable steps and examples shared here to experiment, learn, and grow. Over time, these rules will become second nature, allowing you to focus on creativity and storytelling.
Incorporate photography composition rules into your daily shooting habits to see immediate improvement. Whether you’re building a portfolio, shooting commercially, or capturing life’s moments, strong composition is what separates good photos from great ones. Start today, and watch your images—and your photography career—reach new heights.