Rule of Thirds Explained with Examples
Introduction
The rule of thirds photography is one of the most fundamental composition principles every photographer should understand and apply. Whether you’re a beginner struggling to create balanced and compelling images or a hobbyist looking to improve your framing techniques, mastering this rule will dramatically enhance your visual storytelling.
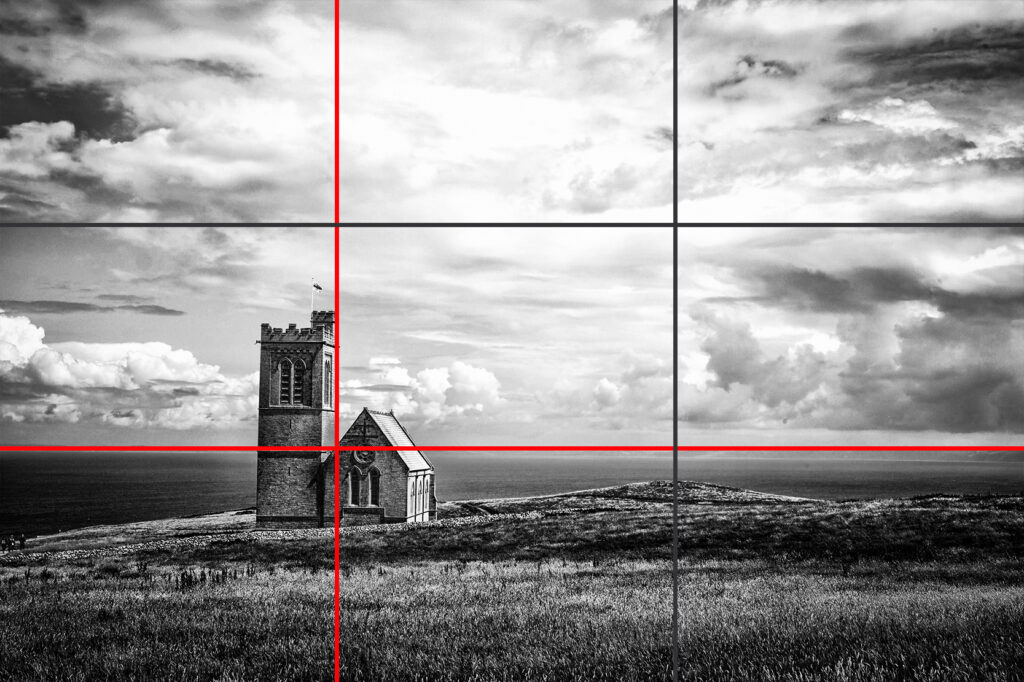
At its core, the rule of thirds divides an image into nine equal segments using two equally spaced horizontal lines and two vertical lines. The idea is to place important elements along these lines or at their intersections, which naturally draws the viewer’s eye and creates a balanced, engaging composition. This simple guideline can make the difference between a snapshot and a photograph that truly captivates.
For working photographers, especially those building a commercial photography business, understanding and effectively using the rule of thirds is essential. It helps you deliver images that clients find aesthetically pleasing and professionally composed. This not only boosts client satisfaction but also builds your reputation and portfolio.
In this comprehensive guide, we’ll break down the rule of thirds photography with clear explanations, practical examples, and step-by-step advice you can implement immediately. You’ll learn how to use this composition rule photography to frame your subjects creatively, improve your business photography, and avoid common pitfalls that many photographers face. Whether you shoot portraits, landscapes, or street photography, mastering the rule of thirds will sharpen your visual skills and elevate your work.
Ready to transform the way you see and shoot? Let’s dive into the world of the rule of thirds and unlock your photography’s true potential.
Key Takeaways
– The rule of thirds photography divides an image into a 3×3 grid, guiding the placement of key elements along these lines or intersections for balanced, engaging compositions.
– Applying composition rule photography helps create natural visual flow, making images more pleasing and professional.
– Framing techniques based on the rule of thirds can enhance storytelling by emphasizing subjects and creating depth.
– Understanding when to break the rule is as important as knowing how to use it—this flexibility leads to creative and impactful images.
– Practical use of the rule of thirds boosts your commercial photography business by delivering consistently strong images your clients appreciate.
– Step-by-step approaches to framing and composing with the rule of thirds can be adapted to various photography genres, from portraits to landscapes.
– Avoid common mistakes like centering subjects unnecessarily or ignoring background distractions, which weaken composition.
– Implementing this rule into your workflow improves not only your shooting but also your editing and client presentations, making your entire photography process more professional.
What is the Rule of Thirds in Photography and Why Does It Matter?
The rule of thirds is a composition guideline that divides a photo into nine equal parts using two horizontal and two vertical lines spaced evenly. These lines create four intersection points often called “power points.” Placing your subject or key elements along these lines or intersections helps create a balanced, dynamic composition.
Why does this matter? Our eyes naturally gravitate toward these points rather than the exact center of an image. This tendency has been studied in visual psychology and is why photographs following the rule of thirds often feel more harmonious and interesting.
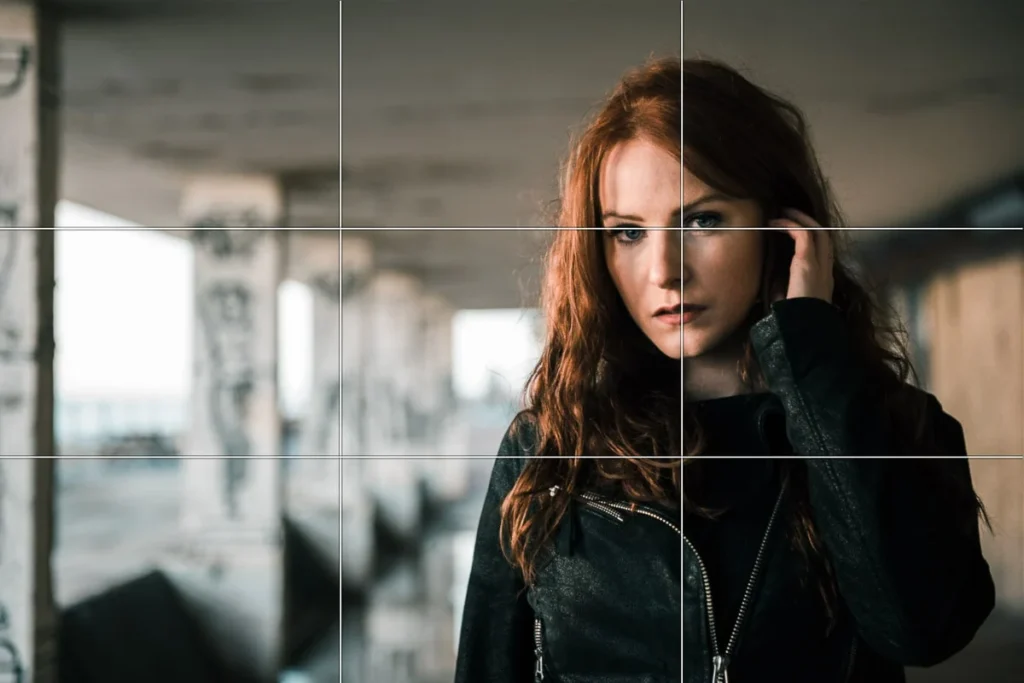
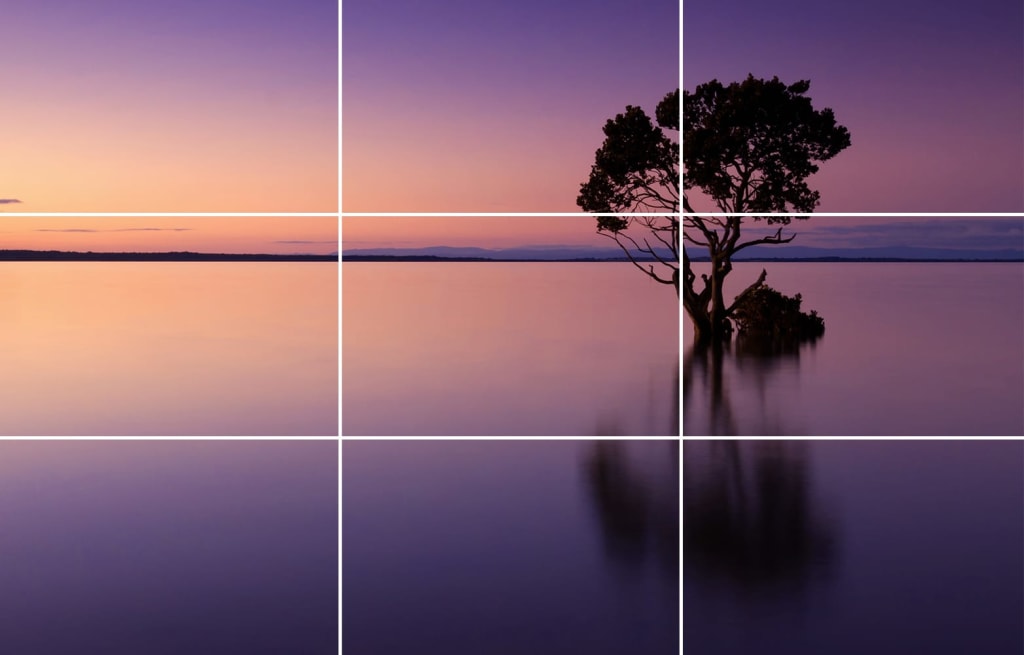
For example, in portrait photography, positioning the subject’s eyes on the top horizontal line and slightly off-center on a vertical line can create a compelling connection with the viewer. In landscape photography, placing the horizon along the top or bottom third can emphasize either the sky or the land, creating depth and interest.
Using the rule of thirds is not just about aesthetics—it’s about guiding the viewer’s eye and telling a story visually. When you apply this rule, you turn flat images into engaging narratives, which is essential for professional photographers seeking to communicate more effectively through their work.
How to Use the Rule of Thirds: Step-by-Step Framing Techniques
Applying the rule of thirds photography becomes intuitive once you break it down into steps:
1. Enable Gridlines on Your Camera or Smartphone: Most cameras and phones have a setting to display a 3×3 grid. Turn this on to visualize the rule of thirds while shooting.
2. Identify Your Main Subject or Focal Point: Decide what element in your frame is most important. It could be a person’s face, a building, or a tree.
3. Position Your Subject Along a Gridline or Intersection: Instead of placing the subject in the center, align it with one of the vertical or horizontal lines, or ideally, place the subject at one of the four intersections.
4. Balance the Composition: Use the remaining space to include secondary elements or negative space that complements the main subject. For instance, if your subject is on the left vertical line, leave space on the right for “looking room” or contextual background.
5. Check for Horizon Placement: In landscapes, place the horizon along the top or bottom third line to emphasize either the ground or the sky.
6. Adjust Your Frame and Perspective: Move around or zoom to ensure your subject aligns properly with the gridlines. Don’t be afraid to experiment with angles.
7. Review and Refine: After shooting, review your images and see how well the rule of thirds has enhanced your composition.
This straightforward approach can be applied to virtually any photography genre and helps you consistently produce balanced, professional images.
Practical Examples of Rule of Thirds in Different Photography Genres
To better understand how the rule of thirds works in practice, let’s look at some real-world examples across various genres:
– Portrait Photography: Place the subject’s eyes on the upper horizontal line and slightly off-center on a vertical line. This creates a natural gaze and depth. For example, when photographing a client for a business headshot, positioning their eyes on the top-left intersection can make the portrait more engaging and approachable.
– Landscape Photography: Position the horizon either on the top third to emphasize foreground elements like flowers or rocks, or on the bottom third to showcase dramatic skies or sunsets. For instance, shooting a beach scene with the sky dominating the frame can evoke a sense of vastness.
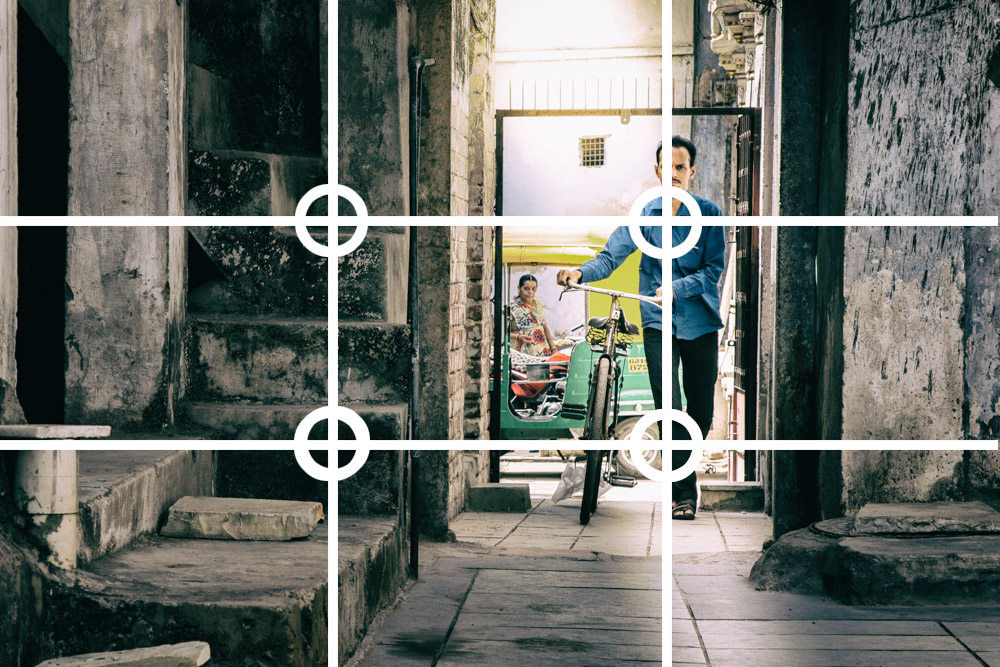
– Street Photography: Use the rule of thirds to place moving subjects along one vertical line, leaving space in front of them to show motion or context. For example, capturing a cyclist on the left third of the frame with empty street space ahead tells a story of movement and direction.
– Product Photography: Place the product slightly off-center to create a dynamic composition and leave room for branding or text overlays. This technique improves commercial appeal when presenting images for marketing or e-commerce.

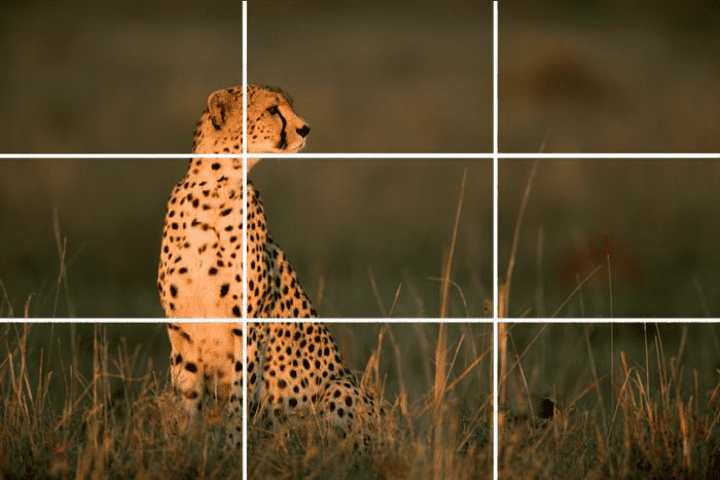
– Wildlife Photography: Position the animal’s eyes on an intersection and leave space in the direction it’s facing. This framing creates tension and anticipation, making the image more captivating.
These examples show that the rule of thirds is versatile and adaptable for any photographic situation.
When and How to Break the Rule of Thirds Photography
While the rule of thirds is a powerful guideline, it’s not a strict law. Knowing when to break the rule can lead to striking and creative images.
– Centering for Impact: Sometimes, placing the subject dead center can convey symmetry, strength, or focus. For example, a symmetrical architectural shot or a portrait with strong eye contact may benefit from central framing.
– Minimalist Compositions: If your image has very few elements, centering your subject or breaking the thirds can create a bold statement.
– Leading Lines and Patterns: When your scene contains strong leading lines or repetitive patterns, following these elements may take priority over the rule of thirds.
– Emotional Effect: Breaking the rule can create tension, unease, or focus on a specific part of the frame. For example, placing a subject very close to one edge can evoke feelings of isolation.
The key is to understand the rule well enough to break it intentionally and with purpose, rather than accidentally.
How Rule of Thirds Photography Enhances Your Client Work and Business
In a commercial photography business, delivering images that are visually compelling and professionally composed is essential for client satisfaction and repeat business.
– Consistent Quality: Using the rule of thirds ensures your images have a polished, intentional look, which clients notice and appreciate.
– Faster Client Approvals: Balanced compositions reduce the need for excessive edits or reshoots, speeding up client approvals.
– Brand Storytelling: Whether shooting for weddings, events, or product catalogs, this composition rule helps convey the client’s message clearly and attractively.
– Portfolio Development: Consistently applying the rule of thirds builds a strong, cohesive portfolio that attracts more clients.
– Marketing and Social Media: Well-composed images perform better on social media platforms, increasing your visibility and potential client reach.
Implementing this simple rule into your shooting workflow can elevate your professionalism, improve client relationships, and grow your photography business.
Combining Rule of Thirds with Other Composition and Framing Techniques
The rule of thirds is a foundational tool but works best when combined with other composition and framing techniques:
– Leading Lines: Use natural lines (roads, fences, shadows) to guide the viewer’s eye toward your subject placed on a third.
– Framing: Incorporate natural frames like doorways or branches aligned with the grid lines to highlight your subject.
– Balance: Use negative space opposite your subject to maintain visual harmony.
– Depth: Layer foreground, midground, and background elements to add dimension, while still respecting the thirds.
– Symmetry and Patterns: Combine with the rule of thirds by positioning symmetrical elements along the lines or intersections.
By blending these techniques, your images become richer and more visually engaging.
Editing and Post-Processing Tips to Maintain Rule of Thirds Composition
Shooting with the rule of thirds is only half the story. Editing your images to enhance this composition is equally important.
– Crop with Purpose: Use your editing software’s grid overlay to crop images precisely according to the rule of thirds.
– Straighten Horizons: Ensure horizons or architectural lines align with the grid to avoid distracting tilts.
– Adjust Negative Space: Crop or clone out distractions to maintain clean framing around your subject.
– Enhance Focus Areas: Use selective sharpening or brightness adjustments around the intersections where your subject lies.
– Maintain Aspect Ratio: Keep a consistent aspect ratio (like 3:2 or 4:3) that supports the rule of thirds grid.
By incorporating these editing steps, you preserve and even strengthen the visual impact of your compositions.
Common Mistakes
Despite its simplicity, photographers often misuse the rule of thirds or misunderstand its purpose. Here are some common mistakes and how to avoid them:
– Centering Subjects Unnecessarily: Many beginners place their subject squarely in the center out of habit, missing the opportunity to create dynamic balance.
– Ignoring Background Elements: Focusing solely on the subject and ignoring distracting background elements can ruin the composition even if the rule of thirds is used.
– Overusing the Rule: Following the rule rigidly in every shot can make your portfolio look formulaic and uninspired. Learn when to break the rule for creative effect.
– Not Using Gridlines: Without enabling grid overlays on cameras or editing software, it’s hard to apply the rule accurately.
– Neglecting Negative Space: Leaving no space opposite your subject creates cramped, uncomfortable images.
– Poor Horizon Placement: Placing the horizon in the center rather than along a third line flattens landscapes and reduces visual interest.
– Ignoring Subject’s Direction: Failing to leave space in front of a subject’s gaze or movement can create a claustrophobic feeling.
Avoiding these mistakes requires conscious practice and reviewing your images critically. Use the rule of thirds as a flexible guide, not a rigid formula.
What to Do Now
To apply the rule of thirds photography effectively and improve your compositions immediately, follow this action plan:
1. Activate Gridlines: Turn on the 3×3 grid overlay on your camera or smartphone. This visual guide is key to applying the rule while shooting.
2. Practice Framing: During your next photo session, consciously place your subject or focal points along the gridlines and intersections. Experiment with different placements.
3. Review and Critique: After shooting, review your images on a larger screen with grid overlays. Identify which shots follow the rule well and which don’t.
4. Shoot Diverse Subjects: Apply the rule of thirds across genres—portraits, landscapes, street photography—to build versatility.
5. Edit with the Rule in Mind: Crop and straighten images during editing to reinforce your compositions.
6. Learn When to Break the Rule: Intentionally try centering shots or off-rule compositions to understand their emotional impact.
7. Seek Feedback: Share your work with peers or mentors and ask for critique focused on composition and use of the rule of thirds.
8. Document and Reflect: Keep a journal or folder of your best rule of thirds images and note what worked well.
By following these practical steps, you’ll internalize the rule of thirds and lift the quality of your photography business portfolio.
FAQs
1. Is the rule of thirds photography a strict rule I must always follow?
No, the rule of thirds is a guideline designed to help create balanced and engaging compositions. While it works well in many situations, there are times when breaking the rule can lead to more creative or impactful images. Understanding the rule thoroughly allows you to use it flexibly and intentionally.
2. How do I enable the rule of thirds grid on my camera or phone?
Most modern cameras and smartphones have a settings menu where you can enable a grid overlay. On DSLRs and mirrorless cameras, look for “grid display” or “composition grid” in the settings. Smartphones commonly include this in the camera app settings under “grid” or “composition grid.” This grid helps you align your subjects following the rule of thirds.
3. Can the rule of thirds be applied in post-processing?
Absolutely. Cropping images using the rule of thirds grid in editing software like Lightroom or Photoshop can improve compositions after the shoot. It’s a useful way to refine framing and balance, especially if the original shot was slightly off-center or unevenly balanced.
4. How does the rule of thirds help with framing techniques?
The rule of thirds provides a framework for placing subjects and framing elements within the image. It encourages deliberate positioning that leads the viewer’s eye, balances negative space, and enhances storytelling. Combining this rule with framing techniques like leading lines or natural frames creates stronger, more engaging photos.
5. Does the rule of thirds apply to video as well as photography?
Yes, the rule of thirds is widely used in video composition too. It helps frame subjects and scenes dynamically, providing visual balance and guiding the viewer’s attention. Videographers use the same grid overlays in cameras and editing software to compose shots effectively.
Conclusion
Mastering the rule of thirds photography is a crucial step for any photographer aspiring to create visually compelling and professional images. This simple yet powerful composition rule guides you to place subjects and elements along gridlines and intersections, naturally drawing the viewer’s eye and creating balanced, interesting photos.
By incorporating the rule of thirds into your shooting and editing workflow, you not only improve your creative vision but also elevate your photography business. Well-composed images satisfy clients, streamline approvals, and enhance your portfolio’s appeal. Whether you shoot portraits, landscapes, or commercial work, this rule provides a reliable foundation for strong visual storytelling.
Remember, the rule of thirds is a guideline, not a rigid law. Learn it well, practice it consistently, and know when to break it intentionally for creative impact. Combining the rule with other framing techniques like leading lines, natural frames, and negative space adds depth and interest to your images.
Start applying the rule of thirds today by enabling gridlines, consciously framing your subjects, and reviewing your work critically. Over time, this practice will become second nature, helping you consistently produce striking photographs that stand out.
In the competitive world of photography, mastering foundational composition rules like the rule of thirds sets you apart as a skilled, thoughtful artist and professional. Use this knowledge as a stepping stone to refine your craft, tell better stories, and grow your photography business with confidence.